
- Design DIY room blueprints
- Use ready-made layout templates
- Preview plans in 2D/3D modes
Compatible with Windows 11, 10, 8, 7
Blueprint Software for People of All Skill Levels
 5.0
Votes: 5
(Rated: )
5.0
Votes: 5
(Rated: )
Planning a reconstruction of your house or a renovation of your office? Either way, you need to make a schematic blueprint for your contractor first. An architect or an interior planner would usually build a blueprint for you. However, if you want to save money, prepare it yourself. Fortunately, you can easily do that in InteriorBox 3D.
You don’t need previous experience to make a blueprint on your computer. With InteriorBox 3D, an intuitive blueprint generator, you can design a floor plan from scratch or enhance an existing one. Below, you will learn about the editor’s endless capabilities and how to use them.
What Exactly is a Blueprint?
Blueprint is a detailed plan of a room or house. Historically, blueprints were created using a paper-based reproduction process that produced white-on-blue images. Nowadays, you can create them digitally.
Such plans include room dimensions, staircases, door openings, windows, and a furniture layout. It allows you to visualize your future house and decide on the design. You can see how different rooms connect, where windows and doors are located, and how the overall space might be utilized. Besides, detailed blueprints let you estimate the total cost of building or renovating your home.

Blueprint vs. Floor Plan: Key Difference
Normally, a blueprint shows room dimensions and orientation, materials, furnishings, exterior structures and other important technical information. A floor plan, on the other hand, is a two-dimensional visual representation of space. It provides a general, non-scale drawing of the building's rooms and their arrangement. So, this is a basic scheme that doesn’t contain the level of detail represented in a blueprint.
Ready to get started with your own project?
Hit the button to download an intuitive blueprint creator!
Compatible with Windows 11, 10, 8, 7
See What's Great About This Blueprint Maker:
Easy-to-Use Tools
You don’t need any skills or experience to create blueprints with InteriorBox 3D. You’ll master its intuitive tools and interface right away.
See your home blueprint in action using 2D and 3D modes. This software also has a Virtual Visit mode that lets you take a glance at the interior from the inside.
If you don’t want to design a house from scratch, you can use ready-made house plan examples. You’ll also find a furniture library and 600+ home decor materials.
How to Make Blueprints Automatically
It will take only 5 simple steps to design a dimensionally accurate and printable blueprint for your renovation. Intrigued? Move on to the blueprint builder tutorial and see that for yourself:
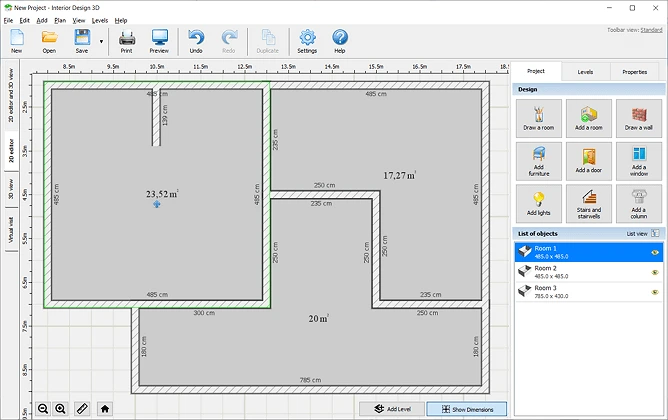
Step 1. Use a Blueprint Template or Plan from Scratch
Run InteriorBox 3D and choose a template in Sample Floor Plans if you want to cut on your draft time. Alternatively, upload an existing floor plan to the house blueprint maker or start a blank project.
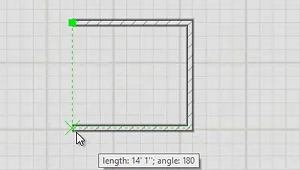
Decided to design a blueprint from scratch? Freehand your plan if you have all the dimensions. Add a starting point on the 2D preview and keep adding corners until you have a complete room. Make sure to follow the dimensions and click on the starting point to complete your room. Add premade rooms of regular and irregular shapes and delimiting walls on the Project tab.
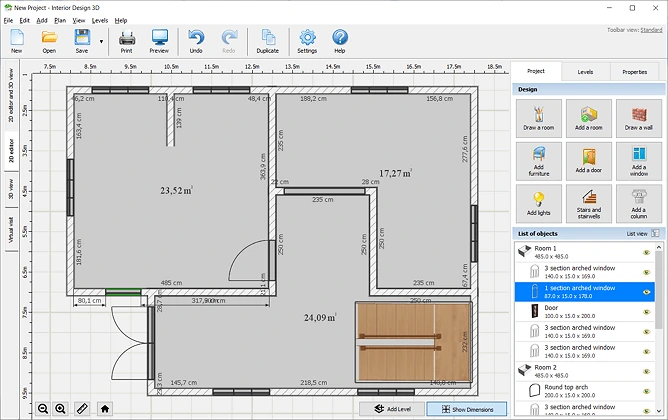
Step 2. Mark Windows, Doors, and Other Openings
Once you finish drawing all the rooms, use the other construction tools of the tab where it’s needed: Add a Door, Add a Window, Stairs and Stairwells, and Add a Column. If you choose any of these options, the blueprint software will open a library of alternatives for you to pick from - arched and double doors, 1-section and picture windows, round and square columns, straight and U-shaped stairs, and other objects.
Pick the element you like, add it to the scene, and find the best location for it on the 2D plan. Convert your blueprint to a 3D model by switching to the 3D view screen.
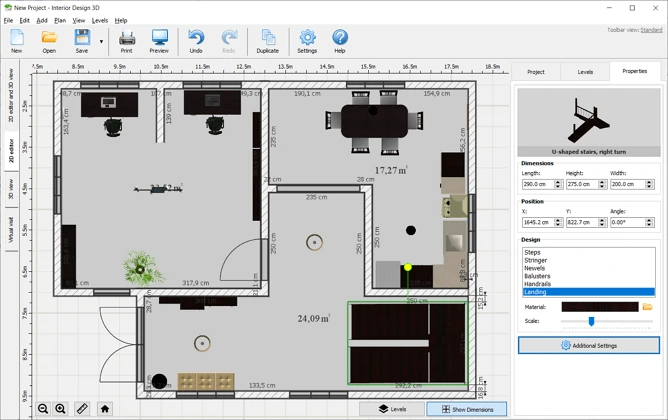
Step 3. Specify the Furniture Layout on Your Floor Plan
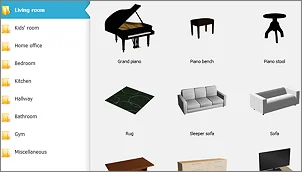
Now it’s time to decorate your place with furniture. Do that using the Add Furniture feature offered by the blueprint designer. The library of furniture and appliances is divided into sections by room type. Switch to the one you need, choose an item, and position it on the 2D plan.
Want to switch the color and size of a furniture piece? Select it on the plan and go to the Properties tab. Here, you can change the dimensions and design of your item - height, length, depth, material, scale - as well as set its position more precisely or flip it.
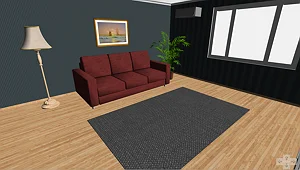
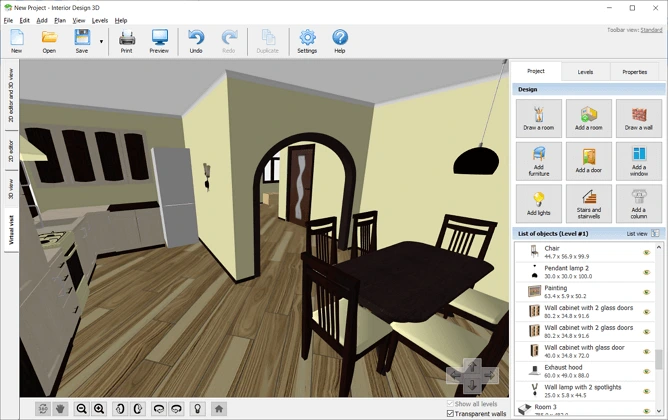
Step 4. Make Your Own Blueprints Turn Virtual
Once your digital blueprint looks like you intended, hit the Virtual Tour button on the left toolbar. You will get a 3D rendering of the space you have created on your flat screen. Use the arrows to your bottom right to walk around the place and see what it will look like in real life.
Employ the bottom bar of the blueprint tool to zoom in and out and adjust your rendering screen. Change the lighting to warm, cold, or dimmed. Choose the angles that convey the vibe of the desired interior best and click Print to have them on paper for your contractor.
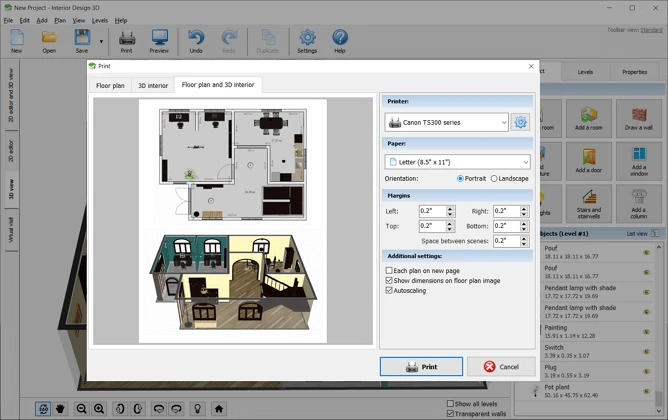
Step 5. Save and Print Your Blueprints
Finally, save your project on your PC to return to it later or send it in. You can have it saved as an InteriorBox 3D project, an image, or a PDF file - whichever works best for you. If you save it as an image or a PDF, make sure to check the Show Dimensions on Floor Plan Image box. This way, your contractor will be able to see all the sizes you have specified in your project.
There you go! You have completed a custom floor plan for your upcoming renovation in this blueprinting software. Now, you can be confident that your future home or office will meet your expectations.
In search of the best blueprint drawing software to plan a renovation ASAP?
Download InteriorBox 3D today and try it for free!
Compatible with Windows 11, 10, 8, 7
Blueprint Examples Made with InteriorBox 3D
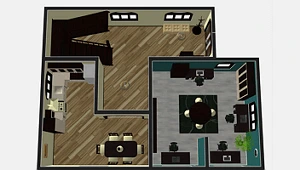
Arrange the Whole Floor
Sketch a blueprint for renovating one of the floors in your house. Bedrooms, living room, bathrooms - all thoroughly planned on a single page.
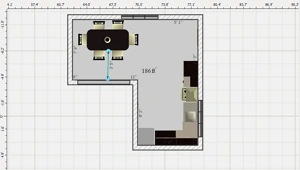
Draw a floor plan for a stylish kitchen to make your meals a special joy to cook. Turn your sketch into a 3D blueprint to see if there is enough space.
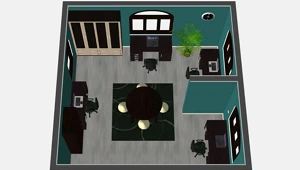
Draft a progressive co-working place for your employees to feel comfortable working at. Create a perfect balance of official and casual in your interior.
With InteriorBox 3D, the blueprint creation process isn’t as intense as in CAD software, yet you still don’t have to draw anything by hand. This house blueprints maker works well for re-arranging any space, whether it's your whole house with multiple levels, an office, or a single residence dorm. And thanks to its premade floor plans, you can get the blueprints of your house even faster. Finally, the budget-friendly InteriorBox 3D shakes off the need to spend money on a professional room planner. Download the blueprinting program today and forget about the stress that renovations often bring.